Environment
Reflection for the Web 2011 (All Editions except Standard)
Reflection Security Gateway 2014 (except Limited Edition)
Reflection Security Gateway 2011
Situation
Reflection for the Web and Reflection Security Gateway provide an alternative option for users to authenticate to the Reflection Server using X.509 client certificates, stored in a keystore or on a smart card accessible to the client. This alternative option allows users to connect to the Reflection server using the standard HTTP or HTTPS ports. This technical note describes how to set up this type of authentication.
This technical note assumes that Reflection for the Web or Reflection Security Gateway are already installed and running. Note: You must be running a product edition listed in the Applies To section.
Resolution
Configuring Reflection – Initial Configuration
Once Reflection for the Web or Reflection Security Gateway is installed on the server, go to a workstation, open a browser, and enter the URL to access the Administrative WebStation, for example:
http://<servername>:<port>/rweb/AdminStart.htmlConfigure Reflection Server to Use Smart Cards
- In the Administrative WebStation, in the left pane, click Security Setup.
- On the Security tab, update the "Designate smart card libraries" section to indicate the dynamic link library (or libraries) used by the smart card software to communicate with the smart card reader. For example, the following are commonly used with ActivIdentity’s ActivClient:
acpkcs211,acpkcs201- Click Save Settings at the bottom of the Security Setup page.
Note: When using ActivClient7 with Reflection Security Gateway or with Reflection for the Web 11.x or higher, you must include the full Windows short (MS-DOS) path to the dll. For example, the short path on a Windows x64 system would be C:\PROGRA~2\ActivIdentity\ActivClient\acpkcs211.dll
Configure Reflection Server for LDAP Authentication and Authorization
- In the Administrative WebStation, in the left pane, click Access Control Setup.
- Click the Configure button.
- Select LDAP, then click the Next button.
- Complete the “Configure Reflection for your LDAP Server” page.
- Verify that the directory search base matches the directory. (The other default settings are usually acceptable.)
- Verify the connection to the LDAP server by clicking the Next button.
Configure x509alt Properties
Configuring x509alt authentication requires manual steps to complete the configuration. Specifically, this entails editing the properties in the PropertyDS.xml file. The PropertyDS.xml file is located in the ReflectionData directory on the Reflection Server:
- On Windows Server 2008, and Windows 7:
C:\ProgramData\Attachmate\ReflectionServer\ReflectionData- On Windows XP and Windows Server 2003:
C:\Documents and Settings\All Users\Application Data\Attachmate\ReflectionServer\ReflectionData- On UNIX and Linux:
/var/opt/attachmate/reflectionserver/reflectiondata- The following properties in PropertyDS.xml are used to configure x509alt authentication on the Reflection Server. Edit the properties as necessary to enable x509alt.
AC.AuthenticationMethods (Required)
Including x509alt:sufficient in the value of this property enables x509alt authentication. The property should look like this when edits are complete:
<CORE_PROPERTY NAME="AC.AuthenticationMethods"> <STRING>admin:sufficient x509alt:sufficient ldap:required</STRING> </CORE_PROPERTY>AC.DualAuthenticationValidateADUserAccounts (Optional)
When this property is set to true (default), it causes CAC authentication to fail if the user’s LDAP account is disabled or does not match the user’s distinguished name (DN) in their certificate.
AC.DirLogonTimeAttr (Optional)
This property is for Smart card authentication and LDAP password expiration. The value must be an LDAP attribute that is a single-valued text attribute.
AC.DirDNResolveOrder (Required)
This property configures Smart card authentication to check email address first, then cn, and then subject as needed. By default it is set to email |cn_val | cn | subject which shows the order of DN resolution. For this string, removing a component or changing the order is allowed. The default value is correct for most environments.
Another value that can be used in the ordered Resolve list is upn. For example, if the value of the property was configured as upn | cn_val | cn | subject, then DN resolution would first try to locate the User Principal Name of the certificate, and then validate to an AD user containing that User logon name.
AC.DualAuthenticationCACFailedMessage (Optional)
The following general message is displayed on the client in a pop-up dialog box, "The attempt to authenticate using a certificate or smart card has failed." Additional text can be appended to this message by defining a value for AC.DualAuthenticationCACFailedMessage. The text in the value will be appended to the general CAC failed message in the pop-up dialog box.
Enter the text that you want to append to the general message between the two STRING tags. For example if you want to append a useful helpdesk message, you would edit the property as follows:
<CORE_PROPERTY NAME="AC.DualAuthenticationCACFailedMessage"><STRING>\n\nFor further assistance:\n 1. Click OK to
logon with User name and Password.\n 2. Call the Help Desk at
411-555-1212</STRING></CORE_PROPERTY>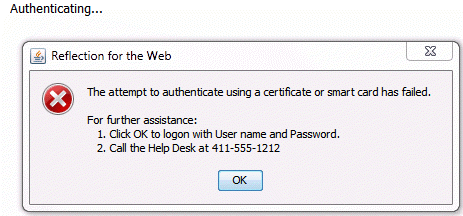
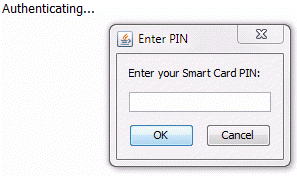
AC.CustomPINPrompt (Optional)
The CAC PIN prompt dialog text can be customized by modifying this property.
<CORE_PROPERTY NAME="AC.CustomPINPrompt"> <STRING>Enter your Smart Card PIN:</STRING>This value would result in the PIN prompt displaying on the client as follows:
- Save and close PropertyDS.xml.
- Restart the Attachmate Reflection Server.
Custom Launcher Template Parameters
To enable x509alt authentication, there are two applet parameters that must be passed through the Reflection for the Web launcher to the client. These applet parameters are added using a custom login page.
- Use a text editor to create a custom login page template file named customcert.jsp and place it in the following folder:
ReflectionServer/apache-tomcat/webapps/rweb/templatesThe template should contain the following code:
<%@ taglib uri="/WEB-INF/rweb.tld" prefix="rweb"%> <html><head> <meta http-equiv="Cache-Control" content="no-cache"> <meta http-equiv="Pragma" content="no-cache"> <meta http-equiv="Expires" content="0"> <title>Reflection for the Web</title><style type="text/css"></style></head> <body><img src="RWeb_M.png" align="top"><BR> <rweb:applet userequest="true"> <rweb:param name="showCloseLinksListButton" value="false"/> <rweb:param name="customCertificatePrompt" value="ca"/> </rweb:applet></body> </html> |
Note: The following parameters shown in the rweb:applet tag above are necessary for enabling x509alt authentication.
- <rweb:param name="showCloseLinksListButton" value="false"/>
This parameter, when set to false, removes the “Close Links List” button. Since the “Close Links List” button does not close the links list when x509alt authentication is enabled, this is necessary to avoid user confusion.
- <rweb:param name="customCertificatePrompt" value="ca"/>
This parameter causes a “Choose a digital certificate prompt” to appear when more than one valid certificate is found on user’s smart card during x509alt authentication.
Note: The customCertificatePrompt parameter can be set to a value of c which adds the “Always use this certificate without prompting” option to the “Choose a digital certificate” prompt. This option enables users to save their certificate selection so that it is cached for future logins. See KB 7022209 for more information.
- In the Administrative WebStation, click Settings in the left pane, then on the General tab in the right pane, enter the filename customcert.jsp in the "Customer login page" field.
Add Intermediate Certificates Authorities to the Reflection Server
For the Reflection Server to trust end user certificates, the intermediate certificate(s) that issued the user certificates must be imported into the Reflection Server's certificate store. Follow these steps to import the intermediate certificate(s):
- Obtain the root and/or intermediate certificates that issued the user certificates on the smart cards and copy them to the following folder:
/ReflectionServer/ReflectionData/certificatesNote: Reflection will use these certificates to validate user certificates obtained from the user’s smart card.
- In the Administrative WebStation, click Security Setup > Certificates tab.
- On the Certificate tab, click the "View or modify certificates trusted by the Reflection management server" link under the "Administer Reflection Management Server Trusted Certificate List" section (the last section on the page).
- Under "Import Trusted Certificates," click the Import button.
- Import each root and intermediate certificate by filling in the certificate file name, password, and friendly name fields. Note: If you do not import the correct root or intermediate certificates, users may not be able to authenticate using their smart card.
- Click Submit and the certificate will be listed in the Import Trusted Certificates list.
Configure Certificate Revocation – Online Certificate Status Protocol Properties (Optional)
Enabling Online Certificate Status Protocol (OCSP) for revocation checking of Smart Card authentication to the Reflection Management Server requires the following manual steps be completed:
- Modify the PropertyDS.xml file in the /ReflectionServer/\ReflectionData folder as follows:
ocspEnabled -
Set to true to enable Online Certificate Status Protocol (OCSP). Note: The OCSP responder's signing certificate must be trusted (see Add Intermediate Certificates Authorities to the Reflection Server).
ocspDesignatedByCA -
Verify the certificate and the OCSP response are signed by the same CA private key.
If set to true, the OCSP signing certificate must be signed by the same private key that signed the SSL/TLS client certificate.
ocspUseAIAExtension -
Use Authority Information Access (AIA) extension in the certificates.
The AIA extension indicates how to access Certificate Authority information and services for the issuer of the certificate in which the extension appears. When set to true, the OCSP server URL specified in the Authority Information Access extension of a certificate is used to check the certificate revocation status using the Online Certificate Status Protocol. If multiple OCSP responders are present in the certificate’s AIA extension, only the first responder in the list is checked.
ocspUseCRLDPExtensionCheckStatus -
Use CRL distribution points extension.
A CRL distribution point is a location where you can download the latest CRL. The CRL distribution points extension identifies how CRL information is obtained. If set to true, the CRL distribution points extension is used to verify the certificate status of the OCSP responder.
ocspUseAIAExtensionCheckStatus -
Use Authority Information Access extension.
When set to true, the AIA extension is used to verify the certificate status of the OCSP responder.
ocspResponders -
To specify more than one URL, use semi-colon (;) between each URL. Only HTTP URLs are supported.
For example:
<CORE_PROPERTY NAME="ocspResponders"><STRING>http://<OcspServer>;http://<OcspServerAlt></STRING></CORE_PROPERTY>Note: If one or more OCSP responders are defined with the ocspResponders property, the OCSP responder in the certificate's AIA extension is not checked even when the ocspUseAIAExtension is set to true.
useJava6CertPathValidation -
Set to true to allow Reflection to communicate properly with Domain Trust Model (DTM) OCSP Responders.
java6OcspResponderSubjectDn -
This property must be set to identify the DN of the OCSP signing certificate when it is not issued by or the same as the CA certificate that issued the certificate being validated.
- Once the OCSP properties are configured, save and exit the PropertyDS.xml file.
- Restart the Attachmate Reflection Server.
Create Self-signed Certificates for Testing (Optional)
For testing purposes, the Java keytool can be used to generate a key pair and keystore. This is not recommended in production environments, but can be used to verify Reflection for the Web and Reflection Security Gateway X.509 authentication functionality.
Note: The Reflection Server installs a private JRE that includes the keytool that can be used to complete these steps. The keytool is found in the following location on the Reflection server: /ReflectionServer/jre/bin/.
- Use the following command to generate a keypair and keystore
keytool -genkeypair -keyalg RSA -alias usercert -keystore usercert.pfx -storetype PKCS12 -validity 3600Note: When entering the following information, make sure that “Common Name” CN= matches the LDAP entries used for Authentication.
What is your first and last name? [Unknown]: John DoeWhat is the name of your organizational unit? [Unknown]: Information TechnologyWhat is the name of your organization? [Unknown]: AttachmateWhat is the name of your City or Locality? [Unknown]: SeattleWhat is the name of your State or Province? [Unknown]: WashingtonWhat is the two-letter country code for this unit? [Unknown]: USIs CN=John Doe, OU=Information Technology, O=Attachmate, L=Seattle, ST=Washington, C=US correct? [no]: yesEnter key password for <usercert> (RETURN if same as keystore password): |
- Use the following command to list contents of the keystore (optional):
keytool -list -v -keystoreusercert.pfx -storetype PKCS12Enter keystore password:Keystore type: PKCS12Keystore provider: SunJSSEYour keystore contains 1 entryAlias name: usercertCreation date: Aug 2, 2013Entry type: PrivateKeyEntryCertificate chain length: 1Certificate[1]:Owner: CN=John Doe, OU=Information Technology, O=Attachmate, L=Seattle, ST=Washington, C=USIssuer: CN=John Doe, OU=Information Technology, O=Attachmate, L=Seattle, ST=Washington, C=USSerial number: 47f4ea98Valid from: Fri Aug 02 08:41:35 PDT 2013 until: Sun Jun 11 08:41:35 PDT 2023Certificate fingerprints: MD5: 0A:54:E0:34:2B:18:6B:FB:48:CD:C1:B0:66:90:AB:85 SHA1: 86:3B:1D:B0:F9:D3:D3:60:8A:2D:BB:5D:0D:2F:9B:89:46:DC:B8:19 SHA256: 9B:E3:6B:23:54:49:2B:37:85:59:5E:D6:93:99:3B:64:D0:70:2A:CC:56:68:CA:79:60:55:BC:93:DD:85:81:19 Signature algorithm name: SHA256withRSA Version: 3Extensions:#1: ObjectId: 2.5.29.14 Criticality=falseSubjectKeyIdentifier [KeyIdentifier [0000: 4E 74 DB 96 1C CD 79 3A F3 F7 02 32 F2 7D A2 74 Nt....y:...2...t0010: 19 52 B0 3E .R.>]]************************************************************************************** |
- Export the user certificate from the Java Keystore (JKS):
keytool -export -alias usercert -file usercert.crt -keystore usercert.pfx -storetype PKCS12Enter keystore password:Certificate stored in file <usercert.crt> |
- Copy the user certificate exported in step 3 (usercert.crt) to the ReflectionData/certificates directory. This folder is where the Reflection Administrative WebStation looks for Certificates to be imported to the “Trusted store.”
- In the Administrative WebStation, click Security Setup > Certificates tab.
- On the Certificate tab, click the "View or modify certificates trusted by the Reflection management server" link under the "Administer Reflection Management Server Trusted Certificate List" section (the last section on the page).
- Under "Import Trusted Certificates," click the Import button.
- Import the certificate exported in step 3 by filling in the certificate file name, password, and friendly name fields.
- Click Submit and the certificate will be listed in the Import Trusted Certificates list.
- On a client workstation insert the smart card into a card reader and access the Reflection Server.
Note: If you prefer, it is possible to use a SoftCert instead of a HardCert (SmartCard) by following these steps:
- Stop the Reflection Server.
- Open the PropertyDS.xml file located under /ReflectionServer/ReflectionData with a text editor.
- In PropertyDS.xml, locate AC.UseX509SoftCerts and set its Boolean value to true.
- Start the Reflection Server.
- Copy the PKCS#12 store (usercert.pfx) from step 1 to the RWEB_PREFS (preference files) location on a client (usually C:\Users\%user%\AppData\Roaming\reflectionweb). See KB 7022221 for information on determining the location of the RWEB_PREFS directory on a client.
- Use the browser on the client to browse to the Reflection Server (http://<servername>:<port>/rweb).
- During x509alt authentication the launcher will check for the usercert.pfx file before checking for the smart card.
- If the usercert.pfx file is found in the RWEB_PREFS location on the client, an Enter Passphrase dialog box opens.
- Once the user enters the correct passphrase for usercert.pfx, x509alt authentication completes and the Reflection links list displays.