Attachmate Worldwide  |   Contact Us  |   NetIQ.com
Home » Support » Solution Library » Technical Notes

Technical Notes

Reflection PKI Services Manager Overview
Technical Note 2425
Last Reviewed 12-Jun-2009
Applies To
Reflection for Secure IT UNIX Client version 7.1
Reflection for Secure IT UNIX Server version 7.1
Reflection for Secure IT Windows Server version 7.1
Summary

This technical note provides an overview of Reflection PKI Services Manager, including how to obtain this component of Reflection for Secure IT, how it works, and an example of the basic steps to follow to configure PKI Services Manager in a Windows environment.

About PKI Services Manager

Reflection PKI Services Manager uses PKI to validate the authenticity of certificates presented by communicating parties. Using PKI Manager you can centrally configure and administer PKI functions, such as the following:

  • Trust anchor certificates and trust chains
  • Local or remote certificate stores
  • Certificate revocation checking using certificate revocation lists (CRLs) or Online Certificate Status Protocol (OCSP)
  • Certificate-to-user-ID mapping
  • Audit logging for multiple servers and clients

PKI Services Manager provides X.509 certificate validation services for the following products:

Reflection for Secure IT Windows Server (starting with version 7.1)
Reflection for Secure IT UNIX Server (starting with version 7.1)
Reflection for Secure IT UNIX Client (starting with version 7.1)

Note: Reflection for Secure IT Windows Client (all versions) does not use the PKI Services Manager for X.509 certificate validation; instead, the client performs its own certificate validation.

After installing and configuring PKI Services Manager, you should configure your installed Reflection for Secure IT product to connect to the PKI Services Manager and use the certificate validation services provided. For details about setting up client or server authentication, see the product user guides available from http://support.attachmate.com/manuals/sshdocs.html.

PKI Services Manager is included as a component of Reflection for Secure IT UNIX Server and Client and Reflection for Secure IT Windows Server, at no additional cost. Note: It is a separate download and installation.

Obtaining PKI Services Manager

The directions for obtaining the Reflection PKI Services Manager add-on vary depending on the type of customer: maintained or new customers, or evaluating customers.

Maintained or New Customers

Maintained customers are eligible to download PKI Services Manager from the Attachmate Download Library web site: https://download.attachmate.com/Upgrades/.

New Volume Purchase Account customers can use link(s) in the e-mail message sent to the order "ship to" contact to download PKI Services Manager files.

The PKI Services Manager file downloads for various platforms are listed in the Download Library under the heading, "Supplemental File – Utility or Add-On," which appears below the "Current Product Release" and "Service Pack or Patch" headings.

You will be prompted to login and accept the Software License Agreement before you can select and download the PKI Services Manager file. For more information on using the Download Library web site, see Technical Note 0200.

Evaluating Customers

PKI Services Manager is available to evaluate when you request an evaluation copy of the following Reflection for Secure IT products from the Attachmate web site (http://www.attachmate.com/Evals/rsit/rsit-eval.htm):

Reflection for Secure IT UNIX Client
Reflection for Secure IT UNIX Server
Reflection for Secure IT Windows Server

You will be prompted to fill out a form and then will receive e-mail with instructions about downloading the evaluation software.

The PKI Services Manager file downloads are intermixed in the file listing of Reflection for Secure IT product downloads, both of which are organized by available platforms under the "Description" heading. The PKI Services Manager file downloads include "PKI Add-On" at the end of the platform description.

If you downloaded the Reflection for Secure IT evaluation software, you must navigate back to the file listing page to obtain the PKI Add-On. Alternatively, you can click the link in the original e-mail to return to the file listing page.

How PKI Services Manager Works

The following diagrams show how PKI Services Manager validates certificates used for authentication. The first example shows how an SSH Windows or UNIX server uses PKI Services Manager to validate a certificate used for client authentication, and the second example shows how an SSH UNIX client performs the same task during host certificate authentication. Refer to the steps below each diagram for an explanation of the process in each environment.

SSH Windows Client Example – Validate Client Authentication Certificate

2425_0.gif

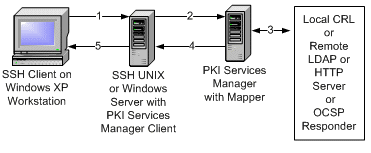
Figure 1: Validate client authentication certificate process diagram.

  1. During the process of user authentication, the SSH client sends a certificate packet to the SSH server (which has Reflection for Secure IT Windows Server or UNIX Server installed on it). The Reflection for Secure IT Server includes a PKI Services Manager client.
  2. The PKI Services Manager client contacts the PKI Services Manager (which may be installed on a UNIX or Windows box) using a proprietary protocol.
  3. The PKI Services Manager verifies the chain of trust, checks to see if the certificate is revoked, and evaluates the mapped rules. Revocation checking is done locally or is done remotely by retrieving CRL files from LDAP or HTTP servers or by contacting an OCSP Responder.
  4. The certificate validation or revocation and user mapping is communicated from the PKI Services Manager to the SSH server.
  5. The SSH server communicates authentication success or authentication failure to the SSH client.

SSH UNIX Client Example – Validate Host Authentication Certificate

2425_1.gif

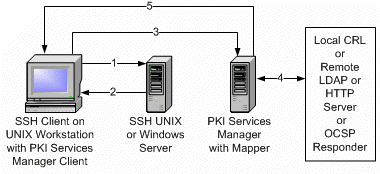
Figure 2: Validate host authentication certificate process diagram.

  1. The SSH client connects to the SSH server to set up an ssh connection.
  2. During the connection setup process, the server identifies itself to the client using a certificate packet.
  3. The PKI Services Manager client contacts the PKI Services Manager (which may be installed on a UNIX or Windows box) using a proprietary protocol.
  4. The PKI Services Manager verifies the chain of trust, checks to see if the certificate is revoked, and evaluates the mapped rules. Revocation checking is done locally or is done remotely by retrieving CRL files from LDAP or HTTP servers or by contacting an OCSP server.
  5. The certificate validation or revocation is communicated from the PKI Services Manager to the SSH UNIX client. The SSH client either accepts or rejects the host identity.

Configuring PKI in a Windows Environment – An Example

Configuring PKI is a multi-step process:

Note: The example in this technical note provides basic steps to configure PKI. Use this information as a starting place to understand how to configure PKI for your environment.

A. Configure the PKI Services Manager.

The following steps use a Windows PKI Services Manager and a Local Store for the CA Certificate Trust Anchor and CRL checking. When configuring the PKI Services Manager, you must be logged in as an administrator.

  1. Launch the Reflection PKI Services Manager console from the \Attachmate Reflection\Utilities folder.
  2. Download a CA certificate (*.cer) to the server running the PKI Services Manager and copy that certificate to the Reflection PKI local store, which is typically located in one of two places:
C:\Documents and Settings\All Users\Application Data\Attachmate\ReflectionPKI\Local-store

or

C:\Users\All Users\Attachmate\ReflectionPKI\Local-store
  1. Download the CRL file(s) (*.crl) to the server running the PKI Services Manager. URL paths for the CRL Distribution Points are normally listed on the Details tab of the Certificate:
2425_2.gif

Figure 3: Identifying URL paths for the CRL Distribution Points.

  1. Using Explorer or a command window, browse to the config directory (c:\documents and settings\all users\application data\Attachmate\ReflectionPKI\config or c:\users\all users\attachmate\reflectionpki\config) and create a file named pki_mapfile (no file extension).
  2. From the Local Store pane, click Add to browse to the local-store folder. Click Open to specify the path to the local store where the *.cer files reside. The certificates should now appear in the Path details section of the pane:

Figure 4: Sample path to Local Store.

  1. From the Trusted Chain pane, click Add. Browse to and select the CA certificate you want to use as the Trust Anchor. Click OK, and click OK. At this point, settings can be saved since a Trust Anchor has been established.
  2. From the Revocation pane, ensure that the Local Store is selected since the Certificate Revocation List (CRL file) resides here (see step 3 above).
  3. From the Identity Mapper pane, define rules that map certificates to identities. There are separate procedures for mapping user certificates and for mapping server certificates.

Mapping User Certificates:

    1. Click Add. From the first drop-down list, select "User Certificate (identifies a user to a server).

Select the “Apply this rule only to this server” check box and enter the server name, for example, winserv1. (Do not use the server’s DNS host name).

Note: This step is required if you are using Windows local accounts. You may skip this step if you are using Windows domain accounts.

    1. Specify one or more identities for the mapped certificate using a comma separated list in the field provided, for example:
<domain name1>\<username1>,<domain name1>\<username2>
    1. Specify how the contents of the certificate affect authentication:

- Enable "Allow authentication if the following condition is met."

- Select "Subject Common Name" from the first drop-down list.

- Select "Contains" from the second drop-down list.

- In the third field, enter a value found for Subject when viewing details of the client certificate.

- Click OK. The rule will display as follows:

User-address=winserv1
{<domain name1>\<username1>,<domain name1>\<username2>}Subject Contains <Value>.

Note: The status bar will display the rule as you build it.

View Full Size
2425_4.gif

Figure 5: Sample mapped user certificate.

Mapping Server Certificates:

    1. Click Add. Select “Host Certificate (identifies a server to a user)”.
    2. Specify one or more identities for the mapped certificate using a comma separated list in the field provided, for example:
ServerIPAddress, ServerName
    1. Specify how the contents of the certificate affect authentication:

- Enable "Allow authentication if the following condition is met."

- Select "Subject Common Name" from the first drop-down list.

- Select "Contains" from the second drop-down list.

- In the third field, enter a value found for Subject when viewing details of the client certificate.

- Click OK. The rule will display as follows:

host
{<ServerIPAddress>, <ServerName>} Subject.CN Equals <Value>.

Figure 6: Sample mapped server certificate.

  1. To save and use configured settings, click File > Save.
  2. From a command window, start winpki:
winpki start

B. Configure the server or client to use the PKI Services Manager validation services.

The following steps use the Reflection for Secure IT Windows Server as an example.

  1. Launch the Reflection for Secure IT Windows Server console and click the Configuration tab.
  2. Go to Authentication > Public Key > Certificates.
  3. In the PKI server field, enter the IP address or host name, and in the Port field, specify port 18081.
  4. If the PKI Services Manager is remote, you must copy the PKI Services Manager public key to a location on each Reflection for Secure IT Windows Server in your PKI environment.
  5. In the PKI Server Public key section, to the right of the Public key file field, use the Browse button to browse to and open the PKI Services Manager public key that you copied in the preceding step.
  6. Click the Save button or click File > Save to save the PKI settings.

Figure 7: Sample PKI server configuration.

C. Configure the clients to authenticate using certificates.

For instructions about configuring the Reflection for Secure IT clients (either Windows or UNIX) to authenticate using certificates, see the appropriate product documentation:

For the Reflection for Secure IT Windows Client, see http://support.attachmate.com/manuals/rsit_win_client.html.

For the Reflection for Secure IT UNIX Client, see http://support.attachmate.com/manuals/rsit_unix.html.

Additional Resources

PKI Services Manager User Guide:

Reflection for Secure IT Windows Server Documentation:

Reflection for Secure IT Windows Client Documentation:

Reflection for Secure IT UNIX Client and Server Documentation:

Reflection PKI Services Manager Supported Platforms: Technical Note 2427

Related Technical Notes
0200 Using the Attachmate Download Library (FAQ)
2424 Reflection PKI Services Manager Does Not Automatically Shut Down or Start Up
2427 Reflection PKI Services Manager Supported Platforms

horizontal line

Did this technical note answer your question?

Yes    No    Somewhat     Not sure yet

Additional comments about this tech note:

Need further help? For technical support, please contact Support.