Environment
Situation
This technical note describes how to perform a new installation or upgrade an existing installation for DATABridge Client 6.0 on a Windows server.
For detailed information about the installation process, see the Client Administration Guide:
https://docs.attachmate.com/databridge/6.0/DB_Client_
Resolution
Installing or Upgrading DATABridge Client 6.0
Follow these steps to install DATABridge Client 6.0 on a Windows server.
Note: If you are upgrading an existing installation, make sure that you install to a new install directory and not to the previous client install directory.
- Locate the installation image.
- Run Setup and click Continue to install.
- On the File Location tab, enter the File Location. The default location is C:\Program Files\Attachmate\DATABridge\6.0.
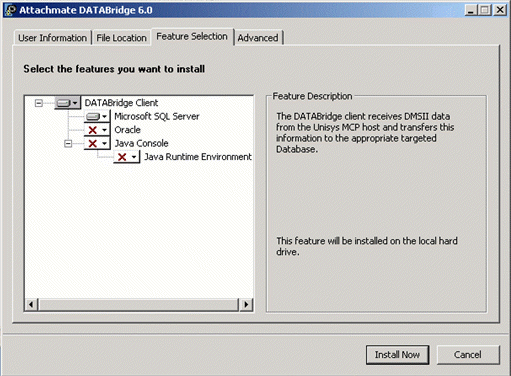
- On the Feature Selection tab, select the client you want to install. By default, the Microsoft SQL Server client is selected.
Figure 1: Selecting the features to install.
- By default, DATABridge installs to the machine on which you run setup. If you want to create an administrative install (in other words, install a source image of the application on a network share, similar to a source image on a CD-ROM), use the Advanced tab.
- Once you have selected the desired options click Install Now to install the product.
Configuring the Installation
Once the installation is complete, you are prompted to make some additional configurations. Configuring updatepath options is required for both a new install and an upgrade.
Important Note for Upgrading: If you are upgrading, you must configure the path and working directory to be able to use the migrate utility that ships with DATABridge 6.0.
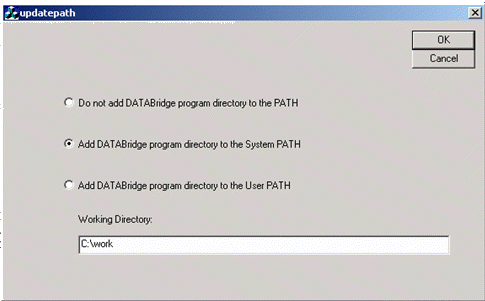
- Select one of two options:
Or, âAdd DATABridge program directory to the User PATHâ
By default, the DATABridge program directory is not added to the PATH.
- Enter the Working Directory. Note: If you are upgrading, the working directory for DATABridge 6.0 must be different from the working directory of your current installation.
Figure 2: Configuring the path and working directory.
If this is a new installation, the install is complete. If you are upgrading from a previous client, proceed to the next section.
Upgrading an Existing Datasource
The migrate utility reads the old configuration files for all of the specified data sources, converts the files to the 6.0 format, and migrates the files to the new working directories. Migrate creates subdirectories for all the data sources using the data source name (in lowercase), and also creates the config, logs, dbscripts and discards subdirectories for all the data sources. Note: The functionality you have configured in your current installation is not affected by using the migrate utility when you upgrade.
Open a DOS prompt and follow the instructions below to use the migrate utility to upgrade an existing datasource.
- Click Start > Run, and type cmd to open a Windows command window. Enter the following commands at the command prompt, pressing Enter after each command.
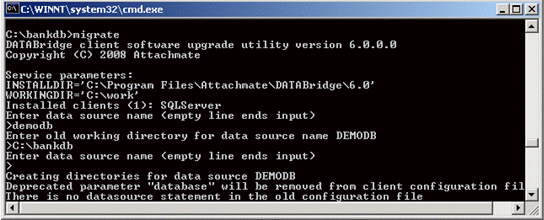
- Type: migrate
The migrate program reads the environment variables from the installation and prompts you for information.
- Type: <source name>
- Type: <old working directory>
- Repeat steps b and c for all of your datasources. When done, press Enter again to complete the process.
Figure 3: Running the migrate utility at the DOS prompt.
The upgrade is now complete. You can run your client from a DOS prompt, or you can configure the console to run the client through the console.
Additional Information
DATABridge documentation is available in the product and online at https://support.microfocus.com/manuals/databridge.html.
For information about how to contact Technical Support, see https://support.microfocus.com/contact/.


