Environment
Situation
By default, Reflection for Secure IT Windows Server uses public key server authentication; however, the Reflection server can also be configured to use a certification file on the server or a certificate stored in the local computer's personal certificate store. This technical note explains how to import a Server certificate into the local computer's personal certificate store, with export private key capabilities enabled, so it can be accessed by Reflection for Secure IT.
Note the following:
- The information in this technical note is only applicable if, in your environment, you do not want to store the certificate in the Reflection Certificate Store.
- You must have Administrative rights to perform these steps.
- You must have the Server certificate in *.pfx or *.p12 format available to import.
- Reflection for Secure IT requires that the private key and certificate selected for host authentication be present (or imported to) the Local Computer | Personal store and must have the export private key capability enabled.
- For DoD PKI (Public Key Infrastructure) compliance, Reflection must be configured to use the SSH server's certificate store, not the Microsoft certificate store.
Resolution
You will import a certificate to the local system certificate store, and then configure the SSH server to use it.
Import a Certificate to the Microsoft Certificate Store
Follow the steps below for the appropriate server:
Windows Server 2012
Certificate Import Wizard under Windows Server 2012 now provides an option to select a “Store Location.” You can also use the Microsoft Management Console to import the Server Certificate. See instructions under Windows Server 2008 for more details.
Follow these steps to use Microsoft’s Certificate Import Wizard to install a Server Certificate to the Windows Server 2012 Microsoft Certificate Store.
- Double click on the *.pfx or *.p12 CA certificate.
- In the Certificate Import Wizard, under Store Location, select the option Local Machine. Click Next.
- Check that the correct *.pfx or *.p12 is selected. Click Next.
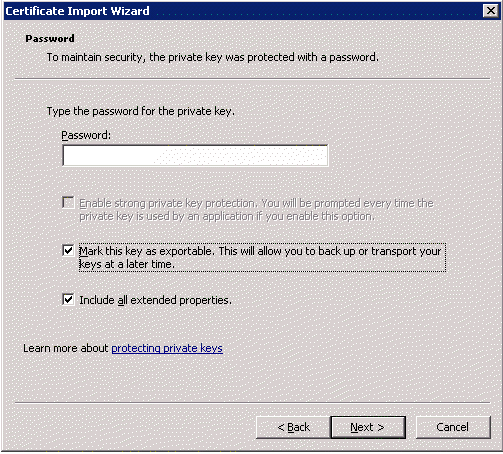
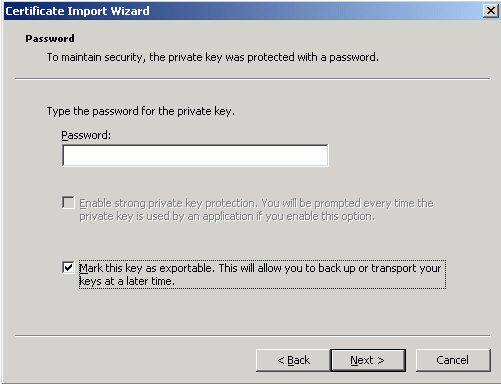
- In the Password window, enter the password if the private key is protected by one. Select the check box "Mark this key as exportable. This will allow you to back up or transport your keys at a later time.”
- Click Next, Next and Finish.
Windows Server 2008
Follow these steps to import a Server Certificate to the Windows Server 2008 Microsoft Certificate Store.
- Click Start. In “Search program and files,” enter mmc, and then press Enter.
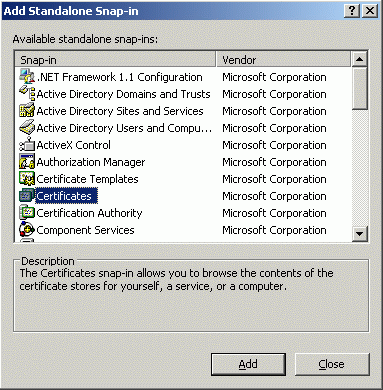
- In the Microsoft Management Console (Console1) window, click File > Add/Remove Snap-In.
- In the Add/Remove Snap-in dialog box, Under Available snap-ins, select Certificates and then click Add.
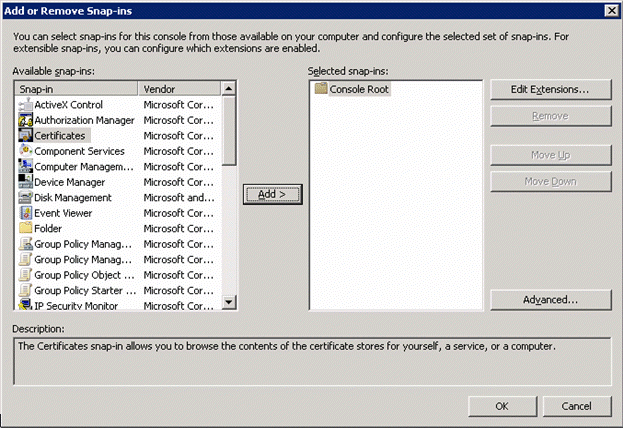
- Select "Computer account," and then click Next.
- Select "Local computer: (the computer this console is running on)," and then click Finish.
- Click OK.
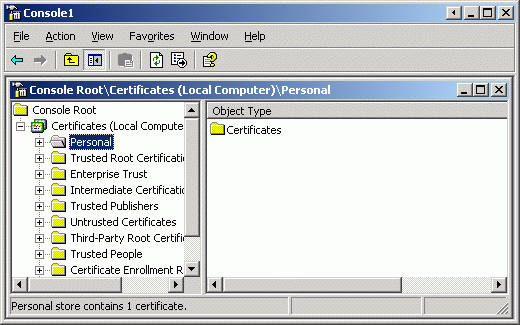
- In the Console1 window, under Console Root, expand Certificates (Local Computer).
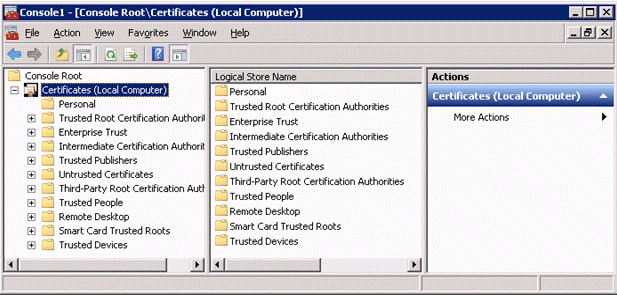
- Right-click the Personal folder, and click All Tasks > Import.
- In the Certificate Import Wizard, click Next.
- Click Browse. In the file type drop-down menu, select Personal Information Exchange (*.pfx, *.p12). Select your *.pfx or *.p12 certificate, and then click Open.
- Click Next.
- In the Password window, enter the password if the private key is protected by one. Select the check box "Mark this key as exportable. This will allow you to back up or transport your keys at a later time.”
- Click Next (accept the default certificate store), and then click Finish. When notified that the import was successful, click OK.
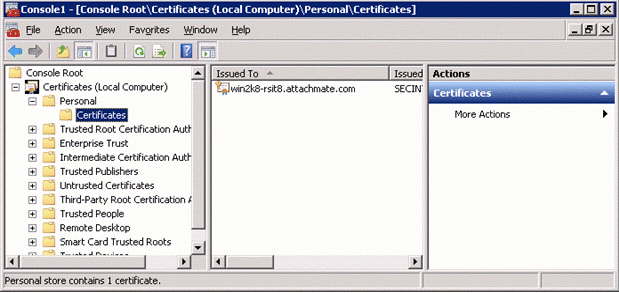
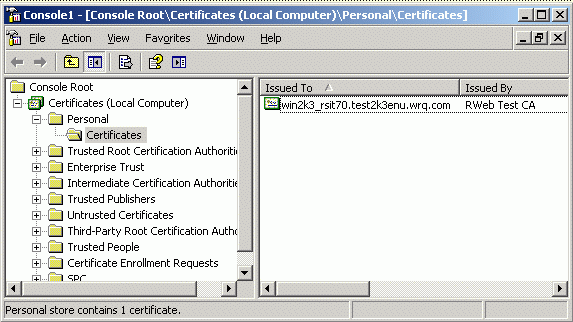
You should now see the certificate in the Console Root > Certificates (Local Computer) > Personal > Certificates folder:
Windows Server 2003
Follow these steps to import a Server Certificate to the Windows Server 2003 Microsoft Certificate Store.
- Click Start > Run.
- In the Open field, enter mmc, and then click OK.
- In the Microsoft Management Console (Console1) window, click File > Add/Remove Snap-In.
- In the Add/Remove Snap-in dialog box, click Add.
- In the Snap-in column, select Certificates, and then click Add.
- Select "Computer account," and then click Next.
- Select "Local computer: (the computer this console is running on)," and then click Finish.
- Click Close, and then click OK.
- In the Console1 window, under Console Root, expand Certificates (Local Computer).
- Right-click the Personal folder, and click All Tasks > Import.
- In the Certificate Import Wizard, click Next.
- Click Browse, select your *.pfx or *.p12 certificate, in the Files of type drop-down menu, select Personal Information Exchange (*.pfx,*.p12), and then click Open.
- Click Next.
- In the Password window, enter the password if the private key is protected by one.
- Select the check box "Mark this key as exportable. This will allow you to back up or transport your keys at a later time." Click Next.
- Click Next (accept the default certificate store), and then click Finish. When notified that the import was successful, click OK.
You should now see the certificate in the Console Root > Certificates (Local Computer) > Personal folder:
Configure the Server's Host Certificate Identity
Once the certificate is available in the local computer's personal certificates store, follow these steps to configure Reflection for Secure IT to use this local certificate.
Note: If you use host certificates in your environment, we recommend that you upgrade to version 7.1 or higher.
- Open Reflection SSH Server Configuration
Windows Server 2012: Go to Apps > Attachmate Reflection
Windows Server 2008 or 2003: Go to Start > Programs > Attachmate Reflection
- Choose the Identity tab.
In 7.2 or higher, select "Use host certificate" to enable the certificate dialog boxes. Select "use the local computer certificate from the Windows certificate store" radio button. If no certificate is listed, click the Browse button to select the local computer certificate for host authentication.
In 7.1, if no certificate is listed, click the Browse button to select the local computer certificate for host authentication.
In 7.0, if you have not yet followed the steps to Import a Certificate to the Microsoft Certificate Store, the following error is displayed when you select the radio button:
"The computer certificate in the system certificate store doesn't contain an exportable private key. Please add a new certificate with an exportable private key to the system certificate store."
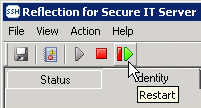
- Click File > Save Settings.
- Stop and restart the Reflection for Secure IT Server.
Additional Information
For more detailed information about server authentication options, see the Server Authentication section of the Reflection for Secure IT Windows Server User Guide, which is available from https://support.microfocus.com/manuals/rsit_win_server.html.
Legacy KB ID
This document was originally published as Attachmate Technical Note 2379.