Environment
Reflection 2014
Reflection for IBM 2014
Reflection for IBM 2011
Reflection Standard Suite 2011
Situation
This technical note describes how to set up Reflection Desktop 16, Reflection 2014, Reflection for IBM 2014, or Reflection for IBM 2011 to connect over SSL-enabled Telnet to an IBM System i (iSeries) using a self-signed certificate.
Resolution
Considerations Before You Begin
Security for Reflection depends upon the security of the operating system, host, and network environment. We strongly recommend that you evaluate and implement all relevant security service packs, updates, and patches recommended by your operating system, host, and network manufacturers.
The recommendations in this note are general guidelines and should be evaluated in the context of your own computing needs and environment. These general steps can also be used to configure Reflection to utilize a registered digital signature and key pair (from a certifying authority); however, it is recommended that you configure and test your SSL environment using a self-signed certificate before implementing a production certificate from a certificate authority.
The Process
Setting up Reflection Desktop 16, Reflection 2014, Reflection for IBM 2014, or Reflection for IBM 2011 to connect to an IBM System I (iSeries) over SSL involves these steps:
Note the following:
- Once you have fully tested the SSL/TLS support, you can repeat steps 2 and 3 using a Certificate Authority (CA) signed certificate.
- Reflection's SSL/TLS support requires that Microsoft Internet Explorer be installed on the client machine. It need not be the primary browser, but Internet Explorer must be installed and configured to be able to manage and use the certificate.
Configure the AS/400 for SSL
Before creating SSL certificates, the Digital Certificate Manager (Option 34 of 57xx-SS1) utility and the Cryptographic Access Provider (57xx-AC3) must be installed and configured on your System i.
Verify that TCP is configured and running on your System i before proceeding.
Create a Self-Signed Certificate
Using the Digital Certificate Manager (DCM), create a self-signed
certificate and assign it to the Telnet Server. For more information on
creating certificates and assigning certificates to applications, see
the System i Information Center at https://www.ibm.com/support/knowledgecenter/ssw_ibm_i
Note the following:
- While creating the certificate, enter the fully-qualified host name in the Common Name field of the certificate.
- If you plan to implement client authentication, you must also create a client certificate. (Those steps are not provided in this technical note.)
- The administrator must maintain physical security of the management server and proxy server. That is, no one other than the administrator should be able to physically access the servers, and no unauthorized individuals should be able to access the key store folders on the server. The security of the servers is important to prevent compromise of the certificates.
Saving the Self-Signed Certificate
The self-signed server certificate can either be saved to a file (by selecting Copy and Paste Certificate) or, for testing purposes, it can be saved directly to your workstation (by selecting Install Certificate).
If you choose Copy and Paste Certificate, you will need to manually integrate the certificate with Internet Explorer. (See steps in Transfer or Extract the Certificate.)
If you choose Install Certificate, the certificate is installed to your workstation and is automatically added to Internet Explorer.
Verify the Setup
To apply the updates to the TCP/IP server, cycle the i5/OS TCP/IP stack. Once you have done this, you will be able to see that the port you have configured for the secure connections is listening.
Execute the i5/OS command NETSTAT *CNN to verify that the port is up and listening for the telnet-ssl local port.
Sample display:
| Remote Address |
Remote Port |
Local Port |
Idle Time |
State |
| * |
* |
www |
001:30:33 |
Listen |
| * |
* |
telnet |
261:48:39 |
Listen |
| * |
* |
telnet -> |
070:54:37 |
Listen |
Note: The Local Port entry telnet-> expands to telnet-ssl. Press F14 to view the port number where telnet SSL is running.
Transfer or Extract the Certificate
When creating the self-signed certificate using the DCM, if you chose Copy and Paste Certificate, rather than Install Certificate, follow these steps to manually integrate the certificate with Internet Explorer.
- From the Windows Control Panel, double-click Internet Options.
- On the Content tab, click Certificates.

- On the Trusted Root Certification Authorities tab, click Import > Next.
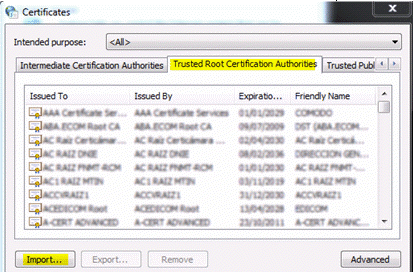
- Click Browse. Browse for and select your self-signed certificate file, and then click Open.
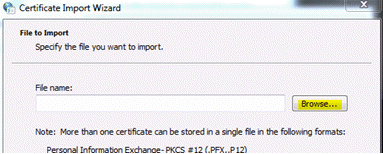
- Click Next, and then click Finish.
- When asked, "Do you want to ADD the following certificate to the Root Store," click Yes.

The new certificate is displayed in the Trusted Root Certification Authorities list.
Make a Connection
To make an SSL connection using Reflection Desktop 16, Reflection 2014, Reflection for IBM 2014, or Reflection for IBM 2011:
- Start Reflection.
By default, Reflection opens by displaying the Create New Document dialog box. (Alternate navigation to Create New Document: click the upper-left icon and click New.)
View Full Size
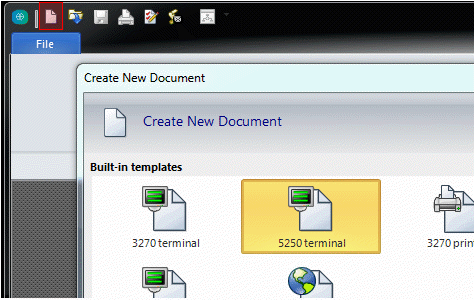
- Under AS/400 (System i), click 5250 Terminal (Default) or one of the other 5250 Terminal options. Click the Create button (lower right).
- In the Host name/IP address field, enter the name of your host as it appears in the Common Name field of the self-signed certificate. Typically, this is the fully qualified host name.
- In the Port field, enter the System i’s secure port number. By default, this is Port 992.
To verify the port number, use the i5/OS NETSTAT *CNN command, and view the port entry for telnet-ssl. (The Telnet-SSL heading may be displayed as telnet->.)
View Full Size
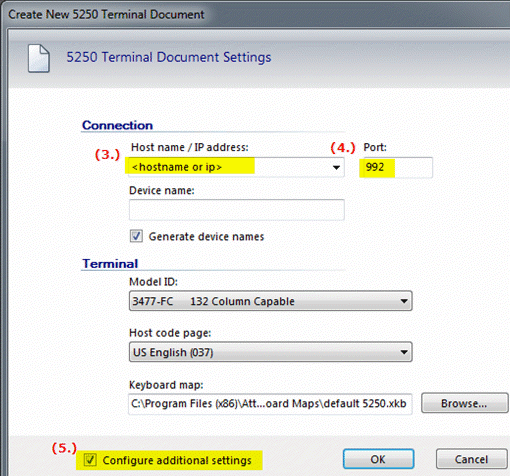
- In the 5250 Terminal Document Settings dialog box, select the check box to Configure additional settings (in the bottom-left corner). Click OK.
- In the Settings dialog box under Host Connection, click Set up Connection (or 5250) Security.
View Full Size
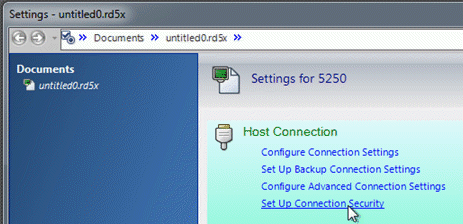
This link is a shortcut to the Security section of the Configure Advanced Connection (or 5250) Settings dialog box.
- Click Security Settings.
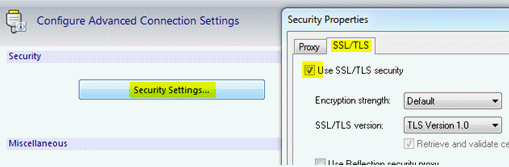
- In the Security Properties dialog box, select the check box to Use SSL/TLS security.
For testing purposes, accept the Encryption strength Default setting.
- Click OK, and then click OK again to connect.
Once you have successfully connected, a blue and gray padlock icon displays in the Reflection display status bar, indicating that your connection is secure.

Troubleshooting
If you are unable to connect using SSL, try again with the following configurations.
- Navigate to Security Settings (see steps 6-7 above).
- In the Security Properties dialog box, click Configure PKI.
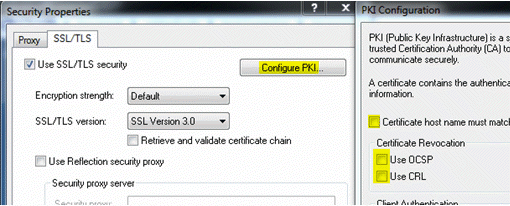
- In the PKI Configuration dialog box, clear all three check boxes:
Certificate host name must match host being contacted
Use OCSP
Use CRL
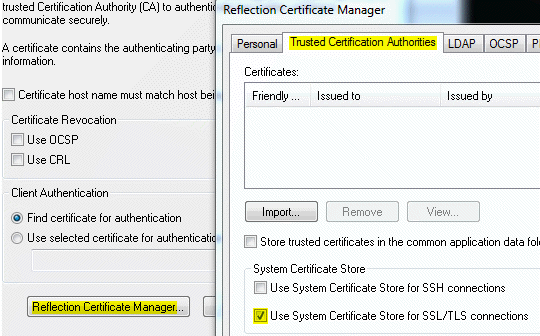
- Click Reflection Certificate Manager
- On the Trusted Certification Authorities tab, verify that the Use System Certificate Store for SSL/TLS connections check box is selected. Click Close.
- Click OK to exit the dialog boxes and connect.