Environment
Reflection for the Web version 12.2 or higher
Reflection for the Web 2014 (All Editions except Limited)
Situation
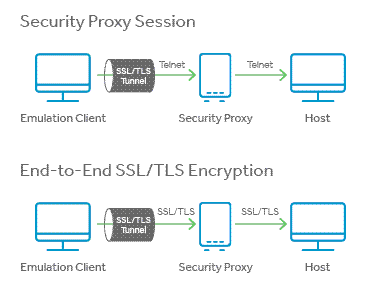
This technical note explains how to configure Management and Security Server or Reflection for the Web to provide end-to-end encryption by tunneling an SSL/TLS direct connection to the host through a security proxy.
Note the following:
- The Security Proxy Server is not included in Limited Edition of Reflection for the Web. For other clients, the Security Proxy is a Management and Security Server add-on product.
- The host must support SSL/TLS direct connections to use this feature.
Resolution
About End-to-End Encryption
In a standard configuration of secure terminal emulation sessions, the connection between the client and Security Proxy Server is encrypted using SSL/TLS, but the connection between the Security Proxy and the host uses unencrypted Telnet. In some network environments it is necessary to have the entire communication path encrypted, from the client, through the proxy server, and to the host.
A terminal emulation session can be configured for end-to-end encryption with token authorization. This feature enables the client to use SSL/TLS encryption to connect to the Security Proxy and the host securely, through an SSL/TLS tunnel. This configuration has the following advantages:
- SSL/TLS encryption is used for the entire connection.
- The IP addresses and names of your secure hosts are not exposed outside of the internal network.
- Only clients with a valid authorization token can launch a secure session.
- The authorization token contains connection information. This enables the Security Proxy to send all secure host connections through a single port, eliminating the need to open multiple firewall ports.
Prepare for End-to-End Encryption
Two certificates and SSL/TLS handshakes are involved in each end-to-end encryption connection: one between the client and Security Proxy server, and one between the client and the host.
Before enabling end-to-end encryption in the client, such as Reflection for the Web, you must configure Management and Security Server for the Security Proxy Certificate and the Host Certificate.
Note: If the option to enable TLS 1.2 and PKI Server is checked in the Administrative WebStation (see Figure 2), both the Security Proxy certificate and the Host certificate need to be trusted by the PKI Server.
For information about configuring the PKI Server, see the PKI Services Manager User Guide, PKI Services Manager User Guide, https://docs.attachmate.com/reflection/pki/1.3sp1/user-html/index.htm#bookinfo
Security Proxy Certificate
The Management and Security Server Security Proxy must be installed and configured. Once the Security Proxy configuration is complete, the Security Proxy certificate is created and imported into the Management and Security Server.
For further details about installing the Security Proxy, see the Management and Security Server Installation Guide: https://www.attachmate.com/documentation/mss-12-4/mss-installguide/
Host Certificate
Once the Security Proxy configuration is complete, follow the steps below to
- Ensure that server verification is successful.
- Enable SSL/TLS on the host.
- Import the SSL/TLS host certificate into Management and Security Server's Terminal Emulator Applet Trusted Certificate store.
Server Verification
To configure your systems so that the SSL/TLS handshake between the client and host is successful, you must do either Option 1 or Option 2:
Option 1: Use Subject Alternate Names (recommended)
When creating the host certificate, list the host name of the Security Proxy Server as a subject alternate name (SAN).
Option 2: Turn Off Server Identity Verification (Web-based sessions only)
Server identity verification can be disabled either globally (for all Web-based sessions), or per session.
Globally:
To globally disable server identity verification:
- In the Administrative WebStation, open Security Setup > Security tab.
- Clear the "Enable server identity verification" check box, and then click Save Settings.
Per Session:
To disable server identity verification for a single session:
- In the Administrative WebStation, open Session Manager and select a session.
- Click Applet Parameters.
- In the Add Parameters section, select the Parameter serverIdentityOverride, and enter the Value False.
- Click Continue > Save Settings.
Note: If you do not disable server verification, you must modify your host certificate with a subject alternate name before you complete the import. The subject alternative name must match the server name used for the Security Proxy.
Enable SSL/TLS on the Host
Refer to your host documentation to enable SSL/TLS on the host.
Import the Host Certificate
To import the host certificate into the client:
- In the Administrative WebStation, open Security Setup > Certificates tab.
- Scroll to the Administer Terminal Emulator Applet Trusted Certificate List section, and click "View or modify certificates trusted by the terminal emulator applet."
- Import the certificate.
Enable End-to-End Encryption
To enable end-to-end encryption:
- Open the Administrative WebStation > Session Manager.
- Click an existing Web-based session or Add a new one.
- Click Launch.
- In the session window, click Connection > Disconnect (if you are connected to a host), and then click Connection > Connection (or Session) Setup.
Click TLS/SSL (or Security).
- In the TLS/SSL security drop-down, select a Protocol.
- Select the "Use security proxy," check box.
- In the Security proxy drop-down, select a Security Proxy server and a Proxy port.
- Enter a Destination host and Destination port (the Destination port should be the TLS/SSL port on the host, for example, host.mycompany.com:443).
- Select the "End to end encryption" check box.
- Click OK to return to the main session window.
- Click Save and Exit.
Additional Information
Legacy KB ID
This document was originally published as Attachmate Technical Note 1883.

