Environment
Reflection X version 14.x
Situation
This technical note describes how to troubleshoot problems connecting with Secure Shell in Reflection X Advantage and Reflection X 14.x.
Resolution
Note the following:
- For more information about Reflection Secure Shell, see KB 7021930.
- You need root access to your host and familiarity with a Linux/UNIX text editor to perform some of the instructions in this document. If you do not have appropriate access or familiarity, contact your system administrator for assistance.
- Reflection for Secure IT Windows Client and Reflection X 14.x should not be installed on the same workstation as it can result in problems with SSH tunneling. Reflection X 14.x contains the full functionality of the Reflection for Secure IT Windows Client.
About SSH Connections
If you have trouble receiving X client displays when using an SSH connection, consider three possible factors:
- Is X11Forwarding enabled on your host?
- Is the SSH server setting the display variable?
- Is the .Xauthority file being read; the xauth program being run?
Using SSH with Reflection X 14.x and Reflection X Advantage requires X11 protocol be sent through an SSH tunnel. This additional process commonly causes Reflection X to fail to receive X client displays. Also, when SSH is used to tunnel X11 protocol, the SSH server should set the display variable. X11Forwarding must be enabled on both the SSH server and SSH client for the SSH server to set the display variable (not the user or a login script).
If you are unable to obtain an X client display when using SSH with Reflection X, follow the steps in this technical note to help troubleshoot the problem.
Use Reflection Workspace or Reflection for UNIX and OpenVMS to Test an SSH Connection
Use Reflection Workspace or Reflection for UNIX and OpenVMS to help determine if the SSH server is running and configured properly. The steps vary depending on your Reflection version.
For Reflection Workspace:
- Click Start > All Programs > Attachmate Reflection > Reflection Workspace > VT terminal > Create.
- Under Connection, select Secure Shell and enter Hostname or IP address.
- Click Configure additional settings, then click OK.
- On the Settings for VT pane, under Host Connection, select "Set up Connection Security."
- Click the Tunneling tab and enable "Tunnel X11 connections.”
- Click OK to save your settings.
- Click OK to connect to the host. If you cannot connect to the host, contact the host administrator or your helpdesk for assistance.
- Log into the host and enter the echo $DISPLAY command. Next, you will compare the output of this command to a list of examples listed to determine your troubleshooting approach.
Note: Remain logged in while working through this technical note, as the session may be used again.
Continue with Interpret the Display Output.
For Reflection for UNIX and OpenVMS:
- Click Start > All Programs > Attachmate Reflection > Host - UNIX and OpenVMS.
- Click Connection > Connection Setup.
- Select the Network option, and then select SECURE SHELL.
- Enter the Host and User names, and click Security.
- Click the Tunneling tab and enable "Tunnel X11 connections.”
- Click OK, and then Connect. If you cannot connect to the host, contact the host administrator or your helpdesk for assistance.
- Log into the host and enter the echo $DISPLAY command. Next, you will compare the output of this command to a list of examples listed to determine your troubleshooting approach.
Note: Remain logged in while working through this technical note, as the session may be used again.
Continue with Interpret the Display Output.
Interpret the Display Output
Compare the display output from step 7 with the information below; then follow the link to the appropriate troubleshooting section.
- Output: <none>
If no data is returned, X11Forwarding may not be enabled. See Enable X11Forwarding.
- Output: PC_IP:0.0
If the display is set to an IP address or machine name other than that of the SSH server, X11Forwarding may not be enabled on the SSH server, and the display has been set by another means, such as by a command line entry or login script. See Troubleshoot the Display Variable.
- Output: hostname:0.0
If the display is set to the host name, or localhost, and the display number is set to 0 instead of 10 or higher, X11Forwarding is probably enabled on the SSH server, but the display variable is being corrupted by a command line entry or login script. See Troubleshoot the Display Variable.
- Output: hostname:10.0, or localhost:11.0
If the display is set to the host name or localhost, and includes display number of 10 or higher, X11Forwarding is probably enabled, and the display variable is probably set correctly. See Troubleshoot .Xauthority and xauth.
Enable X11Forwarding
To enable X11Forwarding on your host, you must locate and edit the SSH server configuration file, and then stop and restart the SSH server daemon.
Locate the Configuration File
X11Forwarding is configured in the SSH server configuration file. Typically the configuration file is either named sshd_config or sshd2_config, and is located in either /etc/ssh or /etc/ssh2. If the file is not in one of these locations, use the find command to search for the file:
find / -name sshd_configView and Edit the Configuration File
Once you have located the SSH server configuration file, use the more command to view the file and see if X11Forwarding is enabled. To view the file, at the command prompt enter:
more sshd_configUse the Enter key to scroll through the file until you find the keyword for X11Forwarding. (The keyword may vary depending on the product, for example, AllowX11Forwarding or X11Forwarding). If this parameter is set to no, follow the steps below to enable the feature.
- Login to your host as root.
- Open the SSH server configuration file in a text editor, such as vi.
- Locate the X11Forwarding keyword entry, such as: X11Forwarding no.
- Edit the X11Forwarding keyword entry, replacing no with yes.
Note: If the line is commented out (preceded by a # symbol), remove the #.
- Save the file and exit the text editor.
Stop and Restart the SSH Daemon
Once the configuration file is modified, stop and restart the SSH daemon.
Note the following:
- Stopping and restarting the SSH daemon will not terminate active Secure Shell sessions.
- You may need to be logged in as root to stop and restart the daemon.
- If you are using SSH2, modify the commands from "sshd" to "sshd2."
Follow these steps to stop and restart the daemon.
- At the command prompt, enter ps -eaf | grep sshd to determine the ssh daemon's Process ID (PID).
Make a note of the PID.
- Enter kill -HUP <PID number> to stop and restart the ssh daemon.
Note: Replace <PID number> with the Process ID number obtained in step 1.
- Enter ps -eaf | grep sshd to verify that the daemon has been restarted.
The ssh daemon's PID should now be different than it was in step 1, and X11Forwarding should be enabled.
- Log off.
Troubleshoot the Display Variable
When using SSH with X11Forwarding, the SSH server is responsible for setting the display variable. While many X users set the display variable to something like PC_IP:0.0 (this is commonly done with the -display switch, manually from a host command prompt, or from within a login script), this should not be done when using SSH.
Note: It is critical that the display variable not be set by another means, as that can result in the display variable assigned by the SSH server being corrupted, or even replaced by one that will allow the X client displays to be sent insecurely, outside of the SSH tunnel.
If the display output (from Use Reflection Workspace or Reflection for UNIX and OpenVMS to Test an SSH Connection) is something like PC_IP:0.0 or hostname:0.0, the display variable has been set, at least in part, by a means other than the SSH server. Remove all commands that edit the display variable and test again. If you perform this step and there is no longer any display output, see Enable X11Forwarding.
Sample Commands
Reflection X 14.x and Reflection X Advantage both provide sample commands that work correctly for SSH connections to UNIX hosts. In Reflection X 14.x, these commands are available in the templates provided for different host types. In Reflection X Advantage, they are available from the client definition Command drop-down list, which shows sample commands for the currently specified Host type. These sample commands include a -display parameter. If Secure Shell is chosen as the connection method, this parameter is disregarded and not sent to the host. If the command sets the display variable in any other way, it will not be disregarded, in which case it should be removed.
For example, if the following command is used with the method of Secure Shell:
(/usr/openwin/bin/xterm -fn 6x13 -sb -ls -display %IP#% -name %T% &)the command passed to the host will be edited to:
(/usr/openwin/bin/xterm -fn 6x13 -sb -ls -name %T% &)However, if you have configured a command like the following instead:
DISPLAY=%IP#%;export DISPLAY;(/usr/openwin/bin/xterm -name %T% &)the entire command will be passed to the host. When using Secure Shell, edit this command to something like this:
(/usr/openwin/bin/xterm -fn 6x13 -sb -ls -name %T% &)If there is no display output after issuing this command, see Enable X11Forwarding.
Note: You can disallow any remote connections. This disables all connection methods other than Secure Shell, and provides the highest level of security.
- In Reflection X Advantage 5.0, select a session definition, click the Security tab, then clear the "Allow remote IP connections" checkbox.
- In Reflection X Advantage 4.2, select a session definition, expand the Network security section of the definition pane, then clear the "Allow remote IP connections" checkbox.
- In Reflection 14.x, click Settings > Network, then select the “Disable remote TCP/IP connections” check box.
Troubleshoot .Xauthority and xauth
If the display output (from Use Reflection Workspace or Reflection for UNIX and OpenVMS to Test an SSH Connection) is something like hostname:10.0, or localhost:11.0, but you still cannot display an X client, the problem may be caused by the .Xauthority file or the xauth program.
Problem with the .Xauthority File
The xauth program, which runs on the UNIX host and is called by the SSH server during each connection attempt when X11Forwarding is enabled, is unable to create, edit, or access the user’s .Xauthority file. To test, follow these steps.
- Ensure that Reflection X is running, and configured with display 0, which is the default. If a display other than 0 is being used, and you are unable to change the value to 0, contact Attachmate Technical Support.
In Reflection X 14.x, click Settings > Display.
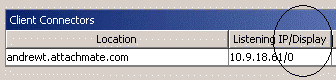
In Reflection X Advantage, start a session, and look at the session status for the running session. The X display number used by the session is under Client Connectors, shown below.
- From the existing host connection with Reflection for UNIX and OpenVMS, enter the command to launch an xterm on your host, such as the following on Solaris:
/usr/openwin/bin/xterm &If a problem exists with the xauth program accessing the user’s .Xauthority file, a message like those below will likely display:
X connection to hostname:10.0 broken (explicit kill or server shutdown).Or:
xauth: timeout in locking authority file /home/<account name>Causes for a problem like this can include:
- Insufficient permissions, either with the .Xauthority file or home directory.
- Incorrect ownership of the .Xauthority file or home directory.
- The account does not have a home directory setup.
- The .Xauthority file has been corrupted.
- The “su” command was used. In this case the new account may not have access to the required .Xauthority file in the original account’s home directory.
- The file is locked by another process on the UNIX server.
Work with the system administrator to correct these problems, and try to launch the X application again.
Xauth Program Does Not Run
The xauth program cannot be found, or run, when called by the SSH server. If it cannot be found, there is often a SSH server configuration keyword that can be used to set the path. This problem would affect all users trying to connect to the given UNIX host. If no users can launch X clients from the given UNIX host when connected using SSH, but users are able to connect and display what appears to be the correct display variable, contact the UNIX host administrator for assistance.
If the problem persists after working through this technical note, contact the host administrator.
Library Conflict
X applications that link to older X libraries (such as X11R5) may fail based on the way the SSH server binds X11 forwarding to the local network adapter. When this occurs, a message similar to the following displays:
X connection to hostname:10.0 broken (explicit kill or server shutdown).Or, a group of error messages, like the following group, may appear in debug logging:
X11 connection uses different authentication protocol.X11 connection rejected because of wrong authentication.X11 rejected 1 i0/o0You can resolve this one of two ways:
- Use X clients that link to X11R6 libraries.
Or
- Look for the keyword X11UseLocalHost in the SSH server configuration file. If it exists, change the value from yes to no, and restart the SSH server.
An Example
To identify the libraries linked to by a specific X application, you can use a command such as chatr. The following example is based on HPUX 11.23.
An hpterm cannot be tunneled, and the explicit kill message is displayed. Run the chatr command to see linked libraries:
chatr /usr/bin/X11/hptermBelow is an excerpt from the output that references X11R5 libraries:
/view/x_r6hpPA_1123/vobs/swdev/pvt/r5hpPA_hpterm_1123/X11R5/lib/libXhp11.1On the same Hewlett Packard host, an xterm displays properly. Run the chatr command to see the linked libraries:
chatr /usr/bin/X11/xtermBelow is an excerpt from the output that references X11R6 libraries:
/view/x_r6hpPA_1123/vobs/swdev/pvt/r6hpPA_1123/X11R6/lib/libXt.3If the problem persists after working through this technical note, contact the host administrator.