Environment
Situation
Before you install a Reflection evaluation product, you must save your customized Reflection settings if you want to restore your previous Reflection installation after you complete the evaluation process. This technical note describes how to save customized Reflection settings and how to restore the settings once you reinstall Reflection 13.0 - 14.x.
Attachmate recommends that you install evaluation software on a test machine and not on your production computer. If that is not possible, the information in this technical note will help you save customized settings and restore your Reflection installation after you evaluate the latest version of Reflection.
Resolution
Before You Install Reflection Evaluation Software
Reflection uses the Microsoft Windows Installer (MSI) technology, which detects and automatically upgrades earlier versions of Reflection (version 8.0.2 or higher) that were deployed using MSI. During an upgrade, MSI migrates the features and registry settings of the earlier version and removes all files installed by the earlier version of Reflection.
Warning: Before installing Reflection evaluation software, note the following:
- You cannot install Reflection evaluation software and retain an earlier version of Reflection. The earlier version will be removed by the upgrade.
- Removing Reflection evaluation software will not restore the previous version.
- If you plan to return to a custom installation of Reflection, you must save the Reflection settings and customizations prior to installing an evaluation copy of Reflection. This is especially important for Reflection X and FTP users.
- To return to Reflection 13.0 – 14.x, you must uninstall Reflection evaluation software from the workstation and then reinstall Reflection 13.0 – 14.x. Reflection settings and customizations can be reapplied only if they were saved prior to the Reflection upgrade.
Saving Your Customized Settings
The process of saving your customized settings varies depending on the product.
Reflection for HP, UNIX, OpenVMS, and ReGIS Graphics
To restore a Reflection for HP, UNIX, OpenVMS, and ReGIS Graphics 13.0 – 14.x installation after you evaluate a later version of Reflection, save your settings prior to installing Reflection evaluation software. Most Reflection settings are stored in the settings file; however, some settings are stored in the registry. In addition to saving your settings files, you must manually save the registry-only settings to restore your installation.
Saving Registry Settings
Follow the steps below to manually save the registry-only settings.
- On the Setup menu, click View Settings.
- With the cursor in the Search text box, press [Alt]+[W].
- In the Enter Password dialog box, type registry in lower case. Click OK.
- In the Display Settings section of the dialog box, select the "Changed from factory defaults" option.
- View the settings in the Reflection Settings section of the dialog box. These are the settings that you need to save. Write down the settings information; you will use this information to restore your installation.
Note: This hidden feature does not hide the keyboard and mouse mappings as it hides all other non-registry settings. You do not need to record setting changes that begin with Keystroke: or Mousechord:; these settings are saved in your settings file.
Restoring Registry Settings
After you reinstall Reflection software, you must manually restore the settings information in the registry. Use the View Settings dialog box to restore the settings values. To open the View Settings dialog box, click View Settings on the Setup menu. Type the values that you recorded in Step 5 in the preceding section to restore your settings.
Saving Reflection Secure Shell Settings
Reflection Secure Shell settings are stored in a file named config. A config file is created when a user changes a setting to a non-default value in the Reflection Secure Shell Settings dialog box and clicks OK. (To open Secure Shell Settings, click Connection > Connection Setup, enter a host name, and click the Security button.)
If you are upgrading from Reflection version 12.0 and using Reflection Secure Shell (SSH), we recommend you make a copy of the config file before upgrading. (Typically, this file was located at C:\Documents and Settings\<username>\My Documents\Reflection\.ssh.)
Reflection for IBM
To restore a Reflection for IBM 13.0 – 14.x installation after you evaluate a later version of Reflection, you must save your settings prior to installing Reflection evaluation software. Save settings files with RSF and RVX extensions. These files are located in the \<user name>\My Documents\Reflection folder.
Note: Before you begin, create a folder in which to save your customized Reflection for IBM files, for example, C:\RIBM8custom.
Saving SNA Settings Files
If you have SNA settings, save the Winnt\System32\Wrqsna.rlf file to the C:\RIBM8custom folder.
Reflection X
To restore a Reflection X 13.0 -14.x installation after you evaluate a later version of Reflection, you must save your Reflection X registry settings, and you must save other customized files. See the following sections for information about how to save your files.
Note: Before you begin, create a folder in which to save your customized Reflection X files, for example, C:\RXcustom. Save the files prior to beginning the upgrade process.
Saving Reflection X Registry Settings
Reflection X settings are stored in the registry. If you want to restore your Reflection installation, use the Reflection X registry utility (Regconv.exe) to save Reflection X settings by converting them into an initialization (INI) file. You can also use the utility to convert INI files to registry entries.
Converting Reflection X Settings into an INI File
Follow these steps to convert Reflection X settings that are stored in the Windows registry into an INI file.
- Run the Reflection X registry utility. Click Run on the Start menu, and type regconv. Click OK. You may need to enter the full path, C:\Program Files\Reflection\Regconv.exe.
- In the Reflection X Registry Utility window's left pane, navigate to the config folder:
HKEY_CURRENT_USER\Software\WRQReflection\RX\config
- On the Registry menu, click Export to INI.
- In the Save to INI File dialog
box, specify an initialization file in which to store the registry
settings (for example, Reg_contents.ini). When you click Open, a
confirmation dialog box opens:
Convert configuration data from 'HKEY_CURRENT_USER\Software\WRQReflection\Rx\config' to 'C:\RXcustom\Reg_contents.ini'?
If the file Reg_contents.ini exists, you are prompted to overwrite it:
Overwrite configuration destination 'C:\RXcustom\Reg_contents.ini'?
Converting an INI File into a Registry Key
To restore a Reflection X installation after you have evaluated a later version of Reflection, reinstall the original installation of Reflection and then import your Reflection X settings from the INI file you created in the preceding section. To import your settings, follow these steps:
- Run the Reflection X registry utility. Click Run on the Start menu, and type regconv. Click OK. You may need to enter the full path, C:\Program Files\Reflection\Regconv.exe.
- In the Reflection X Registry Utility window's left pane, navigate to the config folder:
HKEY_CURRENT_USER\Software\WRQReflection\Rx\config
- Click Registry > Import from INI.
- Select the .INI file you created in the previous section, for example, Reg_contents.ini, and click Open. Click Yes, and then click Yes again. Click OK. This process converts configuration data from the INI file to registry settings.
Saving Customized Reflection X Files
If you have customized Reflection X files, and you want to restore your Reflection X installation after you evaluate a later version of Reflection X, follow the steps below that apply.
Saving Custom Fonts
If extra fonts were added, save the fonts folder that includes Fonts.ali and Fonts.dir, to the RX8custom folder.
- To restore your installation, move the fonts folder to "Program Files\Reflection\X\fonts".
- Verify that the "Subdirectories and font servers" information is correct by clicking Fonts on the Settings menu in the X Client Manager.
Saving a Reflection X Profiled Version
If Reflection X was profiled, save the Rx.ini file to the RXcustom folder. Once you remove the Reflection evaluation software and reinstall the original version, move the Rx.ini file to one of the following folders:
- All Users\Application Data\Reflection\X folder
- <User name>\Application Data\Reflection\X folder
- RX program directory (where rx.exe is located)
Saving Additional Customized Reflection X Files
If any of the following files were customized, save them to the RXcustom folder, and then move them to the correct location after installation: Rwmrc.txt, Rgb.txt, Xhosts.txt, and Xrdb.txt.
Once you remove the Reflection evaluation software and reinstall the original version, move the files to the All Users\Application Data\Reflection\X folder. In doing so, you will overwrite the existing files in this location.
Saving Customized Keyboard Mapping Files
Save customized keyboard mapping files (*.kmp) to the RX8custom folder. Once you remove the Reflection evaluation software and reinstall the original version, move the files to the All Users\Application Data\Reflection\X folder.
Saving Customized Toolbar Settings
If you customized the toolbar, you must save the toolbar initialization file, Rx.tbr, to the RXCustom folder. To restore your original installation, move the file to the \<user name>\My Documents\Reflection\X folder. In doing so, you will overwrite the existing file in this location.
Saving Reflection Secure Shell Settings
Reflection Secure Shell settings are stored in a file named config. A config file is created when a user changes a setting to a non-default value in the Reflection Secure Shell Settings dialog box and clicks OK. (To open Secure Shell Settings, click Connection > Connection Setup, enter a host name, and click the Security button.)
If you are upgrading from Reflection version 12.0 and using Reflection Secure Shell (SSH), we recommend you make a copy of the config file before upgrading. (Typically, this file was located at C:\Documents and Settings\<username>\My Documents\Reflection\.ssh.)
Reflection FTP Client
The Reflection FTP Client automatically saves your custom FTP site and configuration settings. These settings are stored in the Windows registry. (Note: Beginning in Reflection 13.0, FTP settings are saved in *.rfw settings files. So, if you are using Reflection 13.0 or higher, you need not save your settings before evaluating a later version because these settings are automatically saved in the *.rfw file.)
If you are using a version prior to 13.0, you can use the Saveftp utility to export the site and configuration information from your Windows registry. Save this information in a separate folder such as FTP8Custom. Once you complete the Reflection evaluation process, you can import the information to your PC to restore your original Reflection installation.
Note: Reflection FTP client user names and passwords are exported along with the connection information. The passwords are encoded, however, in both the registry and the exported registry file.
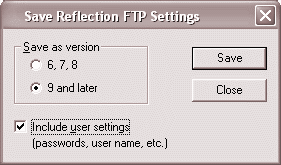
Figure 1 - Save Reflection FTP Settings
Backing Up the Windows Registry
Warning: Before performing any edits, you should back up the Windows registry on your PC.
Use the Windows Registry Editor (Regedit.exe) or another full backup program to back up your Windows registry. For information about the Windows registry, see the Microsoft Knowledge Base Article 256986 at:
http://support.microsoft.com/default.aspx?scid=
Exporting the FTP Client Registry Settings
Attachmate provides a utility named Saveftp.exe to export the registry settings for your Reflection FTP sessions. Follow the steps below to obtain and run the Saveftp utility. Note: You must have a zip utility to perform this process.
- Download the file, Saveftp.zip, from the Attachmate Download Library, to your PC.
- Extract the file using your unzip utility.
- Run Saveftp.exe. The Save Reflection FTP Settings dialog box opens.
- In the Save As Version section, select the "6, 7, 8" option. Select the Include User Settings check box, and then click Save.
- In the Save As dialog box, select the folder in which you want to save the Ftpsettings.reg file. Ftpsettings.reg contains your FTP Client registry settings. Click Save, and then click OK.
Importing the FTP Client Registry Settings
Follow the steps below to import the saved Ftpsettings.reg file to restore your installation.
Note: Before importing the settings, Reflection FTP Client must already be installed on the PC.
- Close all open Reflection applications, and then open Windows Explorer. Navigate to the folder containing the Ftpsettings.reg file.
Warning: Make sure that you have backed up the registry before you import the new settings. Existing registry values that have the same connection names as the ones you are importing will be overwritten when you perform the next step.
- Double-click Ftpsettings.reg to import the registry settings.
If you have multiple user accounts on a single Windows NT machine, you will need to repeat this step after each user logs in.
Reflection for Secure IT Windows Client
In the Reflection for Secure IT Windows Client, your Reflection and SSH settings are stored in the Reflection folder. These settings need not be saved separately before installing evaluation software. For more information about these settings files, see the "New User Folder Location" section of KB 7022105. And for administrators who deploy system-wide settings, additional information about managing settings is available in KB 7022103.