Environment
Reflection for HP version 14.x
Reflection for ReGIS Graphics version 14.x
Reflection for IBM version 14.x
Reflection X version 14.x
Reflection for Secure IT Windows Client version 7.x
Microsoft Windows NT 4.0, Terminal Server Edition (with or without Citrix MetaFrame)
Microsoft Windows 2000 Server with Terminal Services (with or without Citrix MetaFrame)
Microsoft Windows 2003 Server with Terminal Services (with or without Citrix MetaFrame)
Situation
This technical note describes how to deploy Reflection products in the following environment:
- You have multiple Windows Terminal Servers.
- You have a Citrix Farm (a group of Windows Terminal Servers connected using Citrix MetaFrame to share and load balance applications).
Resolution
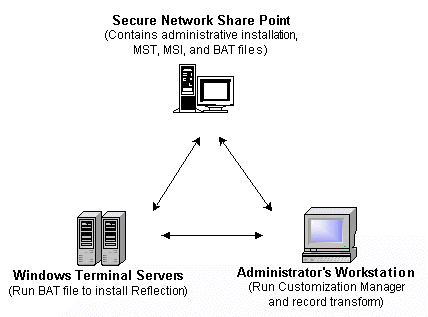
As shown in the image below, deploying Reflection to multiple Windows Terminal Servers requires creating an administrative installation. Install the administrative installation to a secure network share point and then use it to deploy workstation installations to your Windows Terminal Servers.
Caution: Do not put the administrative installation on one of your Windows Terminal Servers. Administrative installations and workstation installations must be located on separate machines.
Follow the steps in the sections below to deploy Reflection to multiple Windows Terminal Servers.
Note: For information about how to upgrade Reflection on multiple Windows Terminal Servers, see KB 7021650.
Step 1: Create a New Administrative Installation
From the administrator's workstation, perform an administrative installation of Reflection to a secure network share point. For details about performing an administrative installation, see the "Performing an Administrative Installation" section of the Reflection Installation and Quick Start Guide. Note the following:
- If the following error displays,
Error 2744. EXE failed called by custom actionAdmin_Restore_RunFromSourceyou are performing an Administrative installation to a network share point that is not part of your domain or not a trusted domain. Repeat the Administrative installation, but make sure the network sharepoint is on your same domain or a trusted domain.
- Installing Reflection requires the Microsoft Windows Installer version 2.0 or higher. Reflection will install the Windows Installer on your Windows Terminal Server if it is not found, which may require rebooting the server or restarting the installation.
Step 2: Install Reflection Administrator's Toolkit to Administrator's Workstation
Perform a workstation installation of Reflection on the administrator's workstation. For Reflection 11.0 or higher, run the installation again and install the Reflection Administrator's Toolkit to the administrator's workstation.
Launch the Install.exe file on the Reflection CD. Click Install Reflection, select Reflection Administrator's Toolkit from the list of products to install, and then click Workstation Install. Follow the instructions in the Wizard to complete the installation.
Run the Install.exe file again to install any Reflection products that require profiling.
Step 3: Set Installation Options
You can specify the installation locations for the Reflection product, the end user's folder for their Reflection-generated files, the Start menu location for Reflection, and choose features and properties by setting the installation options in the Customization Manager.
Note: You must redo any product profiling done for an earlier installation. If you do not re-profile the products, the profiling will be lost when upgrading. However, if you install a non-profiled upgrade, the previous profiling will be retained.
Launching the Customization Manager
To launch Reflection Customization (or Deployment) Manager, use the Windows Start menu shortcut shown below that corresponds to your version of Reflection.
Reflection 14.x: Start > Programs > Attachmate Reflection > Administrative Tools > Customization Manager
Reflection 12.x – 13.x: Start > Programs > WRQ Reflection > Administrative Tools > Customization (or Deployment) Manager
Note: In the example used in this note,
- The administrative installation was performed on a server mapped to the letter J into a folder called Admininstall.
- The transform is named "Citrix2000.mst" and is saved in the J:\Admininstall folder on the network share point.
For more information about Reflection Customization Manager and installing Reflection onto Windows Terminal Servers, note the following resources:
- For information about using Reflection Customization Manager, see the Preparing to Deploy Reflection guide (PDF file):
- When preparing a Reflection installation for your Windows Terminal Servers, Attachmate recommends making decisions as outlined in the technical note that corresponds with your multi-user operating system:
Step 4: Install Reflection on your Windows Terminal Servers
If you are using Citrix Presentation Server 4, you can use the Installation Manager tool to deploy packages to the farm.
Or, you may follow the steps below to install Reflection on your Windows Terminal Servers.
- Create a batch file to install Reflection on your Windows Terminal Servers. It should contain the following:
change user /install<J:>\<Admininstall>\setup.exe /i <J:>\<Admininstall>\<Package name.msi> TRANSFORMS="<J:>\<AdminInstall>\<Citrix2000.mst>" /qbchange user /execute |
In this sample,
- When creating your batch file, lines 2 and 3 of the sample above should be combined on a single line.
- <J:> is your drive mapping.
- <Admininstall> is the location of your administrative installation on the network share point.
- <Package name.msi> is the name of your .MSI file. (In 11.0 or higher, the name of the .MSI file varies depending on the product and version, for example, Mp130ilc.msi or Sx140ilc.msi.)
- <Citrix2000.mst> is the name of your transform created in step 4.
Note the following:
- The second line, from <J:> to /qb, is more than 80 characters and should be entered as one continuous (non-breaking) line.
- If you use a drive mapping in your batch file (like the above example), this drive must also be mapped on each of the Windows Terminal Servers to receive this batch file.
- Save the batch file to the network folder that contains the administrative installation.
- Distribute the batch file using the method described below that applies to your environment.
If you have Citrix MetaFrame: Use the Published Application Manager (MetaFrame 1.8) or the Citrix Management Console (MetaFrame XP) to publish the batch file to all of the Windows Terminal Servers. Note: Make sure that the batch file is published only to Administrators.
If you do not have Citrix MetaFrame: Distribute the batch file to each Windows Terminal Server by some other means.
- To install Reflection, log in as Administrator on each of the Windows Terminal Servers and double-click the batch file icon.