Environment
Situation
This technical note lists the steps to follow to create a batch transfer request file for a 3270 terminal session.
For information about this topic in Reflection 2007, see KB 7021503.
Resolution
Before you create a batch transfer request file:
- Verify that your file transfer options (such as host system, startup command, etc.) are correctly configured in the Transfer Setup dialog box (Setup > File Transfer).
- Open a terminal session to your 3270 or 5250 host.
For 3270 Sessions: Open your 3270 terminal session and connect to your host.
For 5250 Sessions: Open a 5250 terminal session. Disconnect from the host if you are already connected. (In 5250 sessions, you cannot create batch transfer request files if you are currently connected to a host.)
Note: When you add an item to a batch, all aspects of your current file transfer configuration are saved for this item. This includes local and host file information; your settings for Transfer method, If file exists, and Record format; and the current Transfer Setup configuration.
To create a batch transfer request file:
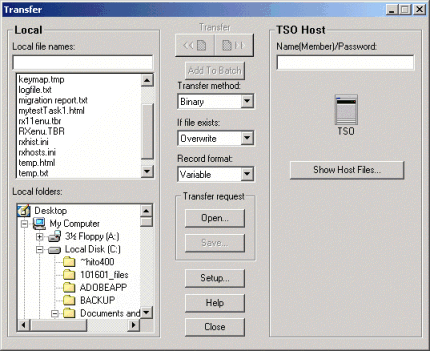
- Open the Transfer dialog box (File > Transfer).
- Click Show Host Files in the Host group box (the name displayed varies, depending on the type of host).
- To transfer a file from the host to your PC:
- On the host, select the file (member) from the Library to transfer.
- In the Local group box, under Local file names, type the name of the file as you want it to appear on your local machine.
To transfer a file from your PC to the host:
- Select the file on your PC to transfer.
- On the host, select the file location to upload the file.
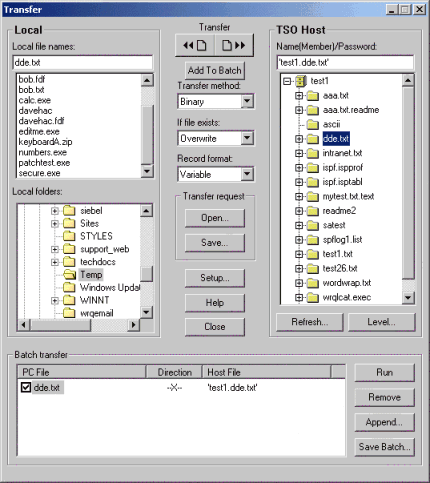
- Click Add To Batch. When you click this button, the dialog box expands to display batch file transfer information.
- Under Batch transfer, check the Direction for the item you just added. If you see an X, you need to specify a direction for this transfer. You can change direction by clicking on the direction symbol for the item you added, or by selecting your item and pressing Ctrl+RightArrow to transfer to the host or Ctrl+LeftArrow to transfer from the host.
- Repeat this process for each transfer operation you want to include in this batch. Do not use the Ctrl or Shift keys to select multiple files for a batch transfer.
Note: If you have existing transfer request files, you can add the items in these files to your batch by clicking the Append button. The item(s) in the request file you select will be added to the batch.
- To save the batch transfer file, under Batch transfer, click Save Batch.
- (Optional) For 5250 hosts only. If you want to use a Window shortcut to initiate batch file transfers, click Shortcut, select Create a shortcut when saving settings files, select a shortcut location, then click OK.
Note: When you create batch transfer files, always create a separate item in the Batch transfer group box for each file you want to transfer.

