Environment
Situation
Text and graphics may sometimes appear too large or too small in Reflection X 14.x. This technical note explains how to adjust your screen resolution and choose the correct font sets to improve display in Reflection X 14.x.
Note: For information about resizing text and graphics in Reflection X Advantage, see KB 7021820.
Resolution
Improving Display of Text and Graphics
Bitmap fonts and graphics are measured in points that correspond to pixels on your computer screen: for example, a 12-point "A" is 12 pixels high on the monitor. Screen pixel size varies according to monitor size and screen resolution, so the size of bitmap text and graphics may appear larger or smaller than intended.
Adjusting Screen Resolution
The easiest way to adjust the size and appearance of text and graphics in Reflection X is to adjust your screen resolution in Windows.
- In the Windows Control Panel, double-click the Display icon (in Windows XP, first click Appearance and Themes).
- Click the Settings tab in the Display control panel.
- Move the slider bar to increase or decrease the screen resolution.
If text is too large, increase the screen resolution by moving the slider bar to the right. If text is too small, decrease the screen resolution by moving the slider bar to the left.
- Click Apply to preview the changes, and then OK to accept the new resolution.
- Restart Reflection X.
Changing Font Sets
Reflection X comes with two different versions of the same standard bitmap fonts: one set at 75 dots per inch (dpi) resolution and one at 100 dpi. In general, 75 dpi fonts look best on screen resolutions less than or equal to 800 x 600 pixels, and 100 dpi fonts look best on resolutions greater than 1024 x 768 pixels. Installing both the 75 dpi and 100 dpi font sets minimizes the need for font scaling and results in a better-looking display.
Note: 75 dpi, 100 dpi, and Misc font sets are installed by default (along with other font sets specific to different hosts). If you experience problems, verify that the 75 dpi, 100 dpi, Misc, and the appropriate host specific font sets are installed.
Follow these steps to see which font sets are currently installed:
- Start Reflection X.
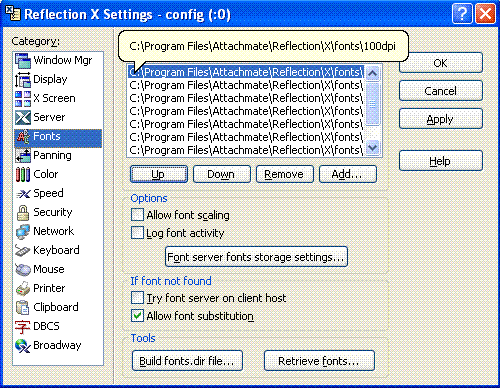
- Click Settings > Fonts.
- The font sets listed in the font path are the ones that are currently available to Reflection X. If the default font sets are not listed in Font Path, you can install them using the Setup program.
- If your PC resolution is 1024x768 or higher, make sure that 100 dpi is listed before 75 dpi in the Font path list (it should be higher in the list).
Configure the X Client Font Selections
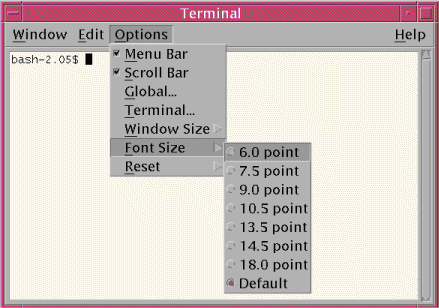
The X client application queries the X Server (Reflection X) to determine what fonts are available, and what the current screen resolution is, then requests specific fonts based on these settings. Many X clients, such as xterm, DECterm, KDE and CDE can be manually configured to use a specific font. The screen shot below shows options available through a terminal window launched through CDE.
For example, if you are using an xterm, the default xterm template provided in Reflection X is configured to use the 6x13 font. You can change the font to any other font available to Reflection X by editing the font folder specified in the font path:
| Font specified |
Command line |
| 6x13 The default font specified by Reflection X template |
xterm âfn 6x13 |
| 12x24 and charr24 Both of these fonts are larger than the default font |
xterm âfn 12x24 or xterm âfn charr24 |
| 5x7 and timr08 Both of these fonts are smaller than the default font |
xterm âfn 5x7 or xterm âfn timr08 |
Installing Additional Font Sets
Follow these steps to install additional font sets in Reflection X:
- Turn off virus protection and exit any Windows programs currently running on your computer.
- Open Add/Remove Programs from the Windows Control Panel.
- Select Reflection X.
- Click Add/Remove. Click Add/Remove again.
- Expand Reflection X, and then expand Reflection X Fonts.
- Click the font set you want to install.
- Select the appropriate installation option and proceed with the installation.
Contacting Attachmate Technical Support
If the suggestions listed above did not fix the problem, please contact technical support. You can expedite your call by collecting the following information in advance:
- The name of the X application and the type of host on which it is running.
- Your current screen resolution in Windows.
- The font sets listed in the Font path located in the Font Settings dialog box in Reflection X.
- A log file generated by checking "Log font activity" in the Font Settings dialog box, and then running the X application from Reflection X.
For information about contacting Attachmate Technical Support, see https://support.microfocus.com/contact/.

